RTV 3531: Multimedia Production I is designed to introduce students to the basic elements of multimedia production: audio recording and editing, basic photography, video production and editing, interactive infographics, and the basic functions of a web platform in order to combine these elements into a comprehensive multimedia website (in this course, we will be using WordPress). Students will spend the the semester populating these sites with content produced using the various multimedia storytelling techniques that we will be learning throughout the semester.
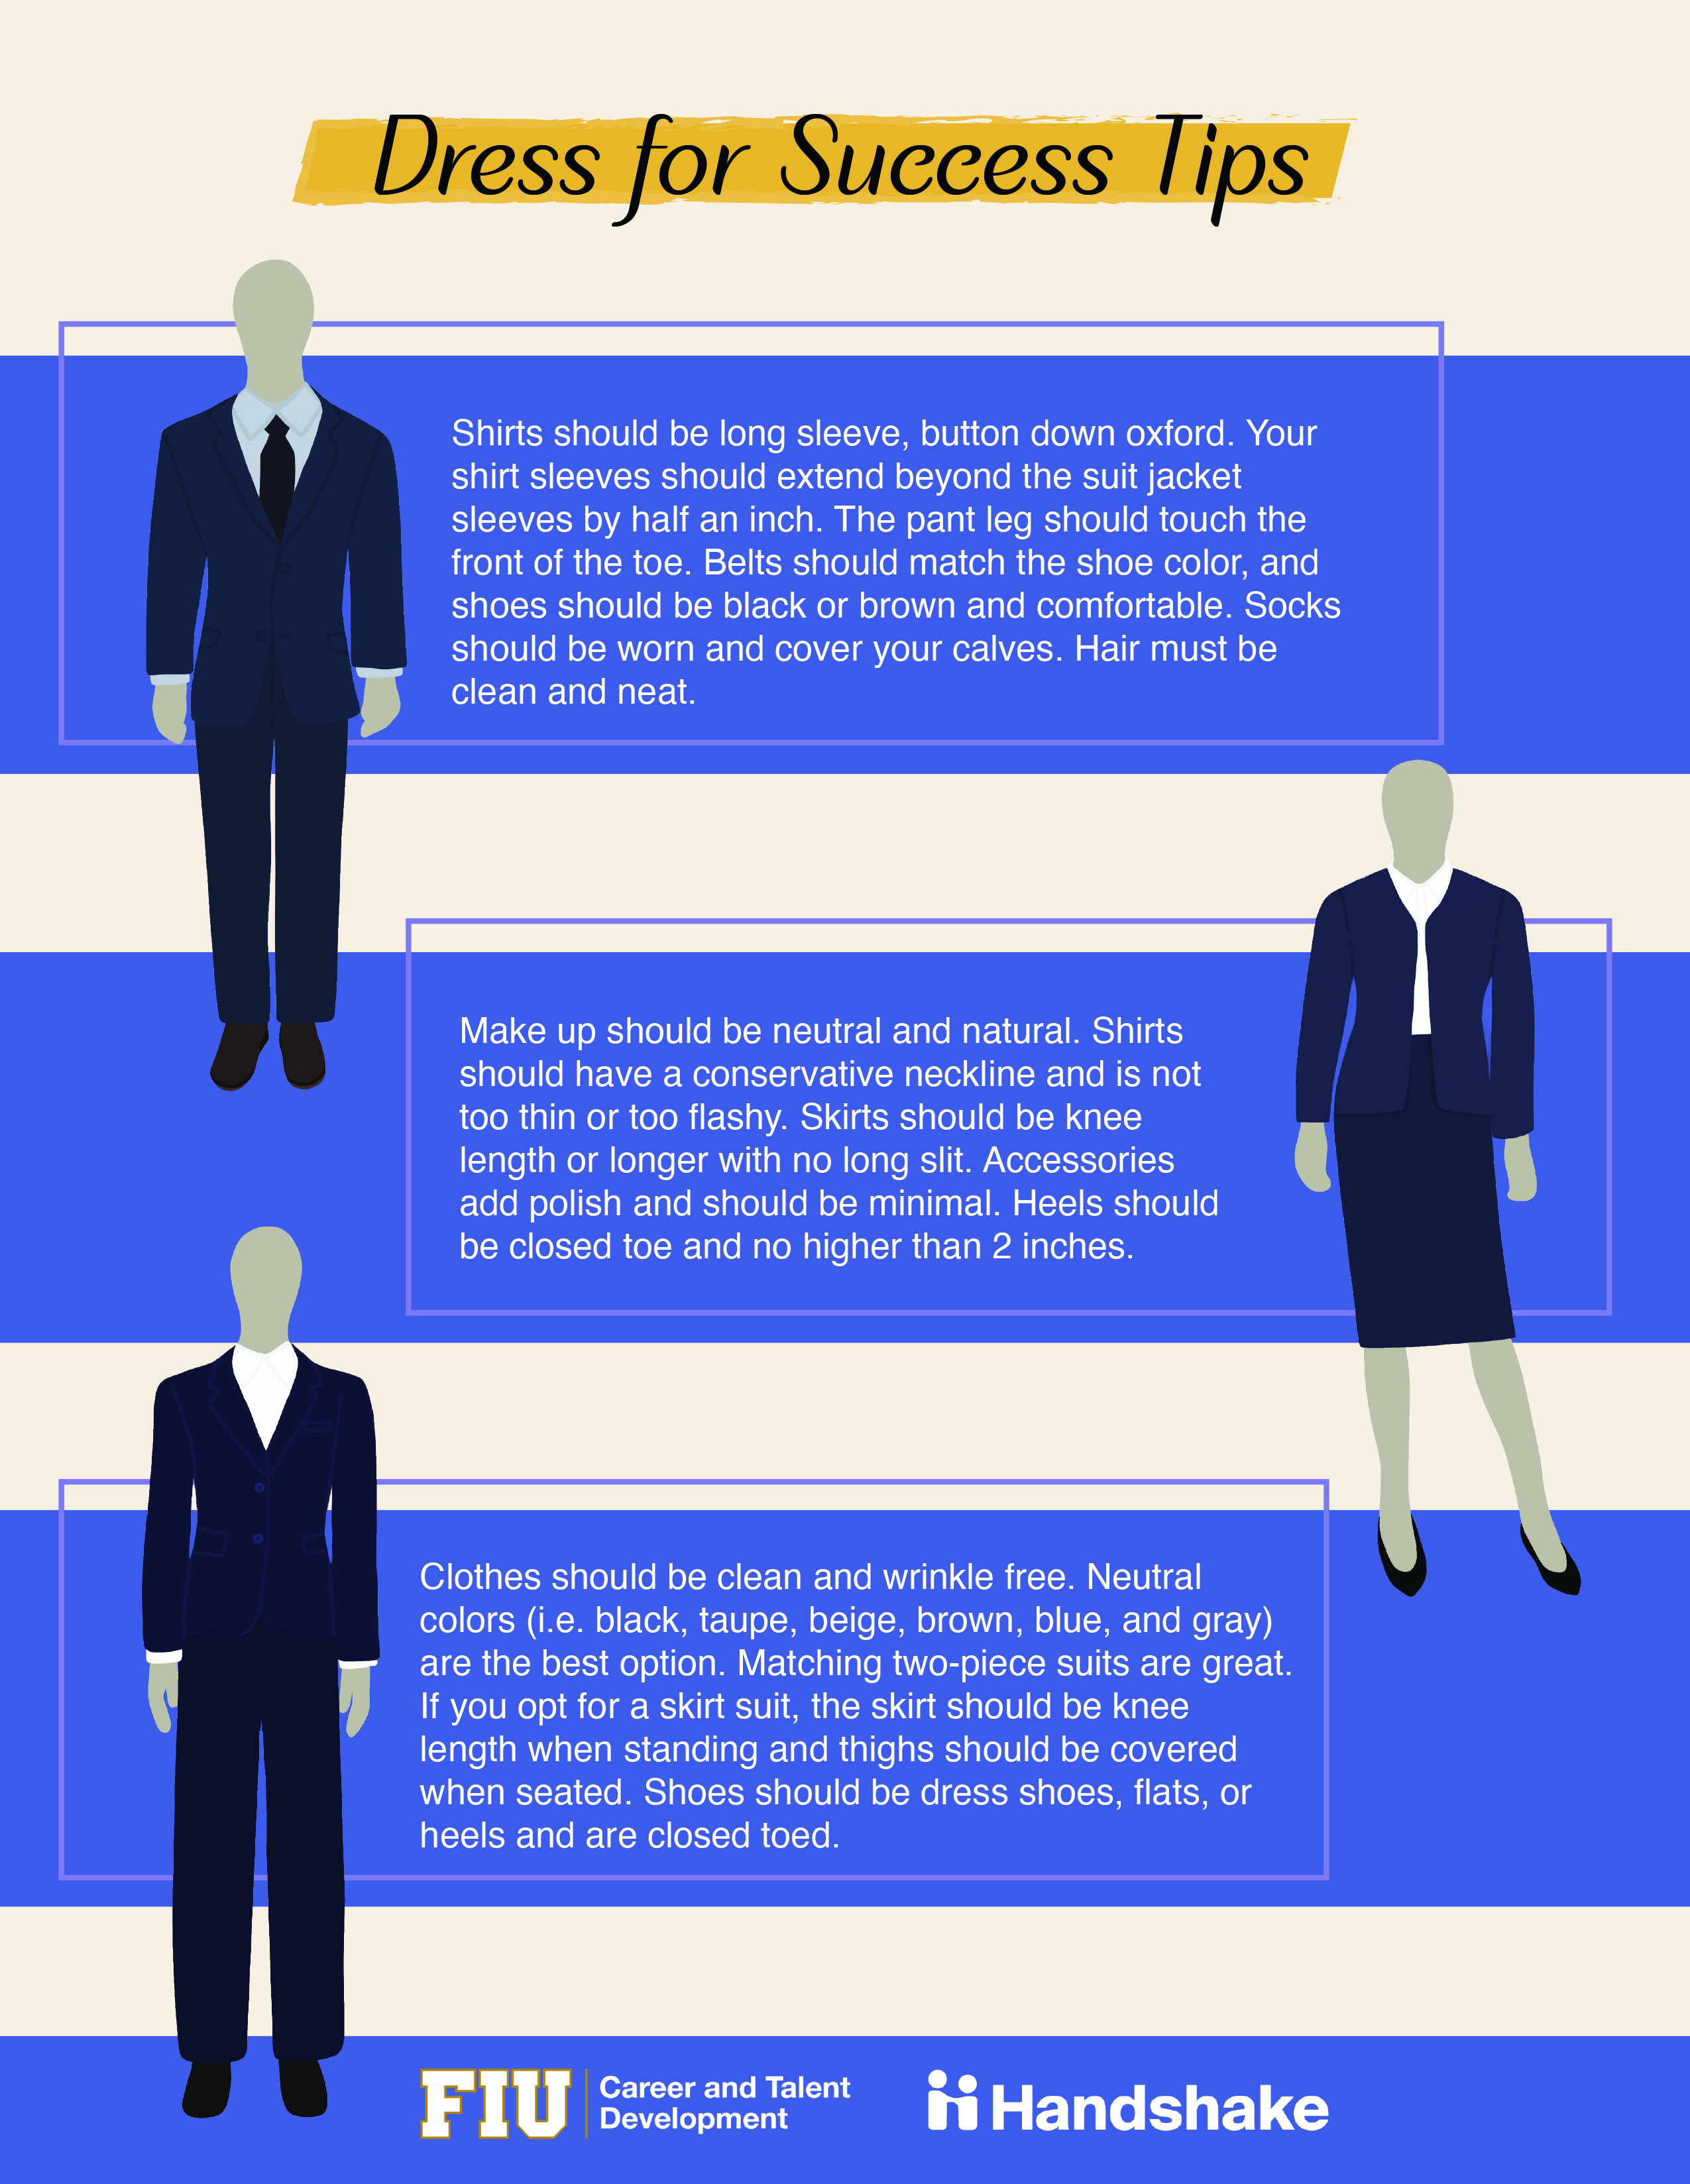
One of the most common—and most important—questions I’m asked is “What should I wear for my headshot session?” Don’t worry we’ve got you covered. Remember three basic wardrobe principles and you’ll find that looking your best is as easy as—well, 1,2,3!
1. Color and Patterns
2. Style and Fit
3. Accessories
1. Color and Patterns
It’s tempting to stick with black and white, but a splash of color can really make your image pop.
Men and Women
Black and/or white may be your “go to” wardrobe choice, and that’s fine, but photographically, pulling details out of black or white can be challenging. So if you love wearing black or white, by all means bring it along, but also bring along colorful options. Men, please no all-black suit coats or sport coats, unless they have obvious texture.
Women
If you know “your colors,” bring items from that palette, or try hues that bring out your eye color and enhance your skin tone. Rich colors and jewel tones are great choices for almost all women.
Men
Guys, avoid a plain white shirt. If white shirts are your signature look, accentuate it with an interesting tie. Avoid the all black jacket, unless it has texture. Charcoal grey is great choice or anything with color or texture. Whatever you bring, make sure you feel good wearing it. If you feel good, you’ll look good.
2. Women’s Style and Fit
Crew, boat or narrow v-necks are always flattering and will always lay nicely. We want to be sure we can see your top after the image is cropped. Standup collars don’t always “behave,” so I suggest women avoid them. If you typically wear a jacket to work, bring a couple of jacket choices, but you do not need to wear a jacket to look professional. I’ve photographed plenty of c-suite women without jackets and without sacrificing their professionalism and status. Also, make sure your clothes fit well. Try them on a few days before your session just to check. Generally, a little snug is better than baggy and loose.
Avoid:
short sleeves or sleeveless styles (unless you’ve got “buff” arms and want to show them off)
low necklines
busy or trendy patterns or plaids
turtlenecks
shiny fabrics — no silk or satin
2. Men’s Style and Fit
Men, if you’re going business casual (specifically, no tie) bring a couple of sport coats. A sport coat without a tie is an intentional wardrobe choice. But if you wear a suit coat without a tie, it gives the impression that you are dressing “down.”
Tie = suit coat OR sport coat.
NO tie = sport coat but NOT a suit coat.
Button-down collars rarely lay nicely in a photo. AVOID button down collars, unless it’s an intentional style choice for you.
Men’s Fit
Make sure your clothes fit well. This is especially important for men’s collars, sports coats and suit jackets. Guys, take a look at your jacket & shirt, watching for gaps at the back of your neck. Conversely, watch that your shirt isn’t too tight, causing your neck to “bulge” over your collar−even a little bulge will look terrible in camera. Think ahead, and invest in tailoring before your session if necessary. It will be money well spent for a professional headshot and a professional overall look.
Guys, if you’re not confident tying a great tie knot, tie it before you come to the studio and slip it over your head. A sloppy tie knot, looks like just that—sloppy. The best tie not by far is the Pratt or Shelby Knot.
3. Women’s Accessories
Less is more. Keep jewelry to a minimum (unless it is your signature look). A few jewelry tips:
Stud earrings are best—simple pearls, diamonds or other gemstones.
Hoops and dangling earrings can interfere with your hair and get lost in your portrait.
If you have jewelry that has special meaning for you, by all means bring it along. But in the end, we want all of the attention on your face not your clothes and jewelry.
Big jewelry draws attention away from you, and your portrait should be all about you.
If your signature brand is big jewelry, however, bring it along, and we’ll choose the best options for your headshot.
FINAL tips for both men and women
Don’t wear your portrait wardrobe in the car; seat belts = wrinkles. Instead, bring your clean, neatly pressed pieces to the session on hangers.
Make sure everything is clean, pressed and fits well.
Bring at least three to four choices. We only need above the waist for headshots. But if you feel more confident by putting on the full wardrobe, feel free to bring the pants and shoes along.
Also, take a few minutes to browse our headshot gallery, and you’ll see some great examples of good wardrobe options.
Eyeglasses
Eyeglasses and lens glare can be tricky. For more information about eyeglasses, take a look at our post with eyeglass tips. If you normally wear glasses, plan to wear them for your picture. It’s ideal if they have a non-glare coating, but if they don’t, consider borrowing a pair of glassless frames for your session; otherwise, we can remove the glass glare in post-production for an additional charge.
You will go out “in the field” and take still photos. Your shot list should include examples of the following:
Extreme Wide Shot or Long Shot (LS)
Shows a broad view of the surroundings around the character and coveys scale, distance, and geographic location.
Wide Shot (WS)
Shows an entire character(s) from head to toe.
Medium Wide Shot (MWS)
Shows a character usually cut off across the legs above or below the knees.
Medium Shot (MS)
Shows a character’s upper-body, arms, and head.
Close Up Shot (CU)
Shows a character’s face and shoulders.
Extreme Close Up (ECU)
Shows only a part of a character’s face, and fills the screen with the details of the subject.
Lead Room
Someone looking or pointing in a direction other than straight into the camera creates a screen force called index vector. You must compensate for this force by leaving some space in front of this vector. Remember, the “reason” for the lead room should not be in the photo.
Rule of Thirds
Proposes that an image should be imagined as divided into nine equal parts by two equally-spaced horizontal lines and two equally-spaced vertical lines, and that important compositional elements should be placed along these lines or their intersections.
YOU ARE ENCOURAGED NOT TO USE YOUR PHONE!
You will then upload these photos to the Google Drive. Combine all photos into one folder to upload (name the folder “Photos”). Make sure you rename all of your photos so I know what shot you took (CU, ECU, MS, etc.). DO NOT EDIT YOUR PHOTOS. MAKE SURE ALL YOUR PHOTOS ARE SHOT LANDSCAPE. YOU WILL RECEIVE A GRADE OF ZERO ON THIS PROJECT IF ANY PHOTOS ARE NOT IN FOCUS! The due date for this assignment can be found in the syllabus and in Canvas.
It was the famous photojournalist Robert Capa who once said “If your photographs aren’t good enough, you’re not close enough.” He was talking about getting in amongst the action. If you feel like your images aren’t ‘popping’, take a step or two closer to your subject. Fill the frame with your subject and see how much better your photo will look without so much wasted space. The closer you are to the subject, the better you can see their facial expressions too.
2. Shoot every day
The best way to hone your skills is to practice. A lot. Shoot as much as you can – it doesn’t really matter what. Spend hours and hours behind your camera. As your technical skills improve over time, your ability to harness them to tell stories and should too. Don’t worry too much about shooting a certain way to begin with. Experiment. Your style – your ‘voice’ – will emerge in time. And it will be more authentic when it does. — Leah Robertson
Leah Robertson is a super talented Melbourne based photographer and videographer, specialising in music and documentary photography.You can see her work here.
3. See the light
Before you raise your camera, see where the light is coming from, and use it to your advantage. Whether it is natural light coming from the sun, or an artificial source like a lamp; how can you use it to make your photos better? How is the light interacting with the scene and the subject? Is it highlighting an area or casting interesting shadows? These are all things you can utilise to make an ordinary photo extraordinary.
4. Ask permission
When photographing people, especially while in countries with different cultures and languages, it can be hard to communicate. In certain countries if you photograph someone you are not ‘supposed’ to photograph, it can get ugly and rough very quickly if you are not careful. So out of respect you should always ask permission. I have started shooting a series of school children in Pakistan. These are all posed portraits and they are looking down the lens. My guide helps me with the language and I limit myself to smiling, shaking hands, giving ‘hi-five’ and showing them the image on the back of my camera once it is done. You would be amazed how quickly people open up. — Andrea Francolini
Andrea Francolini is a well known Italian born, Sydney based sports photographer. He is also the founder of My First School, as trust which has the aim to facilitate educations in Northern Pakistan. You can see his work here.
5. Use flash during the day
You might think that you should only use flash at night time or indoors, but that’s not the case at all. If it is an extremely bright day outside and the sun is creating harsh shadows on your subject, switch on your flash. By forcing extra light onto your subject, you will be able to fill in those ugly shadows and create an even exposure.
6. ISO
There are questions to ask yourself when deciding what ISO to use:
What time of day are you shooting? If you are shooting outside during the middle of the day you will need to use a lower ISO such as 100 or 200. If you are shooting at night time without a tripod you will have to increase the ISO to a higher number to be able to record the light on the camera’s sensor.
Will the subject be well lit? If your subject or scene is too dark you will need to use a higher ISO such as 800 or 1600.
Do you want a sharp image or an image with more movement in it? Using a high shutter speed to capture fast movement might mean that you need to use a high ISO to compensate. Likewise, if you’re using a slow shutter speed to capture blur you will need a low ISO to compensate.
Don’t forget, increasing your ISO increases the grain or pixel size in your photo. So don’t use an ISO of 3200 or 6400 if you don’t want a photo with a lot of ‘digital noise’.
7. f/4
f/4 is my ‘go to’ aperture. If you use a wide aperture with a long lens (200mm-400mm) you’re able to separate the subject from the background. This helps them stand out. Works every time. — Peter Wallis
Peter Wallis is a sports photographer extraordinaire, working for The Courier Mail in Brisbane. You can see his work here.
8. You’ve got to be joking
A well timed joke will always yield a more natural smile, than simply saying “smile” — Dean Bottrell
Dean Bottrell is a Emerald based photographer who specializes in portraiture. You can see his work here.
9. Buy books, not gear
Having expensive camera equipment doesn’t always mean that you’ll take good photos. I’ve seen some absolutely amazing images shot with nothing more than a smart phone. Instead of having ten different lenses, invest in some fantastic photography books. By looking at the work of the masters, not only do you get inspired, you come away with ideas to improve your own photos.
10. Read your camera’s manual
The best way to know what to do with your camera is to actually read the manual. So many people miss this really important step on their photographic journey. Every camera is different, so by reading the manual you’ll get to know all the funky things it’s capable of.
11. Slow down
Take time to think about what is going on in the viewfinder before pressing the shutter. How are you going to compose the shot? How are you going to light it? Don’t jump straight in without giving it some thought first. — Brad Marsellos
Brad Marsellos is the Wide Bay über Open producer. You can see his photos, videos and musings on life here.
12. Stop chimping (checking the photo on the back screen)
It’s a bad habit digital photographers can develop. Time and time again I see photographers take a photograph and then look at the back of the screen straight away. By doing that you could miss all the special moments. You can look at your photos later. You can miss ‘the shot’ and it affects the flow of your work, so just keep shooting! – Marina Dot Perkins
The lovely Marina Dot Perkins is a news, travel and wedding photographer who worked for The Canberra Times and is now based in Newcastle.
13. Framing
This is a technique to use when you want to draw attention to something in your photograph. By framing a scene or a subject, say with a window or an archway, you lead the viewer’s eye to the primary focal point.
14. Shape with light
Never shoot with the sun directly behind you. It creates boring, flat light on the subject. If you shoot with the light source to the side or behind the subject, you are able to shape with the light, creating a more interesting photo. — Patria Jannides
Patria is not only a talented news photographer, she is also my long term friend, mentor, and personal cheer squad. She even helped me to land my first job as a paid photographer. Thanks for everything P xxx
15. Watermarks
This tip isn’t in direct relation to TAKING photos, but it does affect the look of photos. When it comes to watermarks, the smaller the better. And if you can avoid using them, do.
Chances are, unless you are a paid professional, there’s not much of a chance of your photos getting nicked. But in reality, they won’t prevent your images from getting stolen. They only distract from the fabulous image that you’ve created, because once you’ve slapped a watermark all over it, that’s all the viewer will be looking at. The only way you can prevent your images from being stolen is to not publish them on the internet.
Read Open producer Luke Wong’s blog post on watermarks here.
16. Be present
This means make eye-contact, engage and listen to your subject. With the eyes – lower that camera and be human. Bring the camera up for a decisive shot. But remember to lower it, like you’re coming up for air, to check in with your subject. Don’t treat them like a science experiment under a microscope. Being there with your subject shows them respect, levels the playing field in terms of power dynamics, and calms them down. You’ll get much more natural images this way. — Heather Faulkner
Heather Faulkner is a photographer who convenes the ePhotojournalism major at QCA, Griffith University. She is also the executive director of The Argus, a student-run, visual journalism online magazine. See her personal work here.
17. Shutter speed
Being aware of your shutter speed means the difference between taking a blurry photo and a sharp photo. It all depends on what you are after. If you are shooting a sporting event or children running around in the backyard, you probably want your subjects to be in focus. To capture fast action you will have to use a shutter speed over 1/500th of a second, if not 1/1000th to 1/2000th. On the opposite end of the scale, you might want to capture the long streaks of a car’s tail lights running through your shot. Therefore you would change your camera’s shutter speed to a long exposure. This could be one second, ten seconds, or even longer.
18. Charge your batteries
This seems like a simple one, but pretty much every photographer on the face of the planet has been caught out before. Including myself. The trick is to put the battery onto the charger as soon as you get home from your photo shoot. The only thing then is to make sure you remember to put it back into the camera after it has been recharged…
19. Focal length
Keep it simple. I shoot with two prime lenses and one camera; A 28mm and a 35mm. For everything. I use the 35mm lens 70% and the 28mm lens 30% of time. It takes some time to get used to it, but once you work it out, shooting primes is the only way to go. It means you have to work with what you have and you can’t be lazy. Basically, this means more pictures and less fiddling around with zooming and maybe missing moments. It also helps for consistency. If you’re working on a project or a series, keeping the same focal lengths is a great way to maintain a powerful sense of consistency. — Justin Wilkes
Justin Wilkes quit his job in Sydney this year to cover the political and social change in post revolution Egypt. He has since had his photographs published in The New York Times, TIME magazine, and The Jakata Globe to name but a few. You can see his amazing documentary work here.
20. Be part of a photographic community
Like ABC Open! Not only will you be able to publish your photos for the rest of the country to see, you’ll be part of an active group that offers feedback on how great you are going. You can learn new things to help you improve your technique, and you might even make some new photography buddies.
21. Shoot with your mind
Even when you’re not shooting, shoot with your mind. Practice noticing expressions and light conditions. Work out how you’d compose a picture of that scene over there that interests you, and what sort of exposure you might use to capture it best. — Leah Robertson
22. Return the favor
Always remember that if you are shooting people in a different country, they are probably doing you a favor by posing. So the least you can do is return this favor some way or another.
I often return to the same places year after year, so I bring along prints and look for the people I photographed previously. In some areas people do not have a picture of themselves. Imagine not having a picture of you and your family? Strange don’t you think? Yet many people don’t. So a $0.50 print can really make someone happy. It also opens doors for more photography further down the track. — Andrea Francolini
23. Have a camera on you at all times
You can’t take great photos if you don’t have a camera on you, can you? DSLR, point-and-shoot or smart phone, it doesn’t really matter. As long as you have access to a camera, you’re able to capture those spontaneous and unique moments in life that you might have otherwise missed.
24. The golden hour
Shoot portraits and landscapes in the golden hours — the light is softer and the colours are more vibrant. — Dean Bottrell
25. Keep it simple
Don’t try to pack too many elements into your image; it will just end up looking messy. If you just include one or two points of interest, your audience won’t be confused at where they should be looking or what they should be looking at.
26. Don’t get bogged down by equipment
We’ve all seen these types of photographers out and about. They usually have three or four different cameras strapped around their necks with lenses long enough for an African safari. In reality, there’s probably no need for all that equipment. One body with one or two lenses means that you’ll be freer in your movements to capture interesting angles or subjects on the move.
27. Perspective
Minimize the belly-button photograph. This is a reference to Moholy Nagy of the Bauhaus movement in photography (which was all about lines of perspective). In other words, perspectives are more engaging when we crouch down, or lie down, or elevate our position in reference to the subject. Look at how changing your perspective can change the visual language and implied power dynamics of the image. Crouching low can make your subject more dynamic, whereas gaining height on your subject can often minimize their presence in the image. One of my favorite exercises is to make my students lie down and take pictures, often in the dirt. I am a little cheeky. — Heather Faulkner
28. Be aware of backgrounds
What’s in your frame? So often I see great photos and think “didn’t they see that garbage bin, ugly wall, sign, etc?” It’s not just the person or object in your frame, it’s everything else in the background that can make or break a great photograph. So don’t be afraid to ask the person to move (or move yourself) to avoid something ugly in the background. — Marina Dot Perkins
29. Shade
Shade can be your best friend. If there is no way you can make the available light work for your photo, shoot in the shade. You’ll get a nice even exposure with no patchy highlights throughout your shot.
30. Rule of Thirds
This is one of the most common tips that pop up when it comes to improving your photos.
To break it down, you cut your frame into thirds by using both horizontal and vertical lines. You then place your point of interest over the cross sections of the grid.
Check out this article for further details about using the rule of thirds.
31. Exposure
I’ve been shooting a lot of protests lately. Basically, they’re just a lot of people really close to one another; often moving. After having made many mistakes with getting my exposures right, I worked out that if the sun is behind me and in the face of protestors I will set exposure compensation to underexpose by a stop to bring out even tonal range. When the sun is behind the protestors I like to over expose just slightly to bring out the shadow details on their faces. This could apply to street photography when the light is in front or behind your subject. — Justin Wilkes
32. Don’t spend too much time post-processing
The key is to get it right in the camera first, so you don’t HAVE to spend time editing. Over working a photo in editing software very rarely looks good, unless you are trying to achieve a super-artsy effect. If it takes you longer than ten minutes to alter your photo, maybe think about going back out into the field to re-shoot it.
33. Variation
Variation is key. I often use a recipe from Life Magazine picture editors for building a story narrative. I look for: over-all shots or scene-setters, interaction, action, portraits, details, medium shots and of course the signature image. Having this list in my head helps me start photographing a story that sometimes isn’t visually apparent until you get into it. This is great when you’re in a crowded or busy place. — Heather Faulkner
34. Become one with the camera
Push the button regardless of the outcome so the camera becomes part of your hand. — Dean Saffron
Dean Saffron is a photojournalist and an ABC Open superstar. His video The Spokesman, has had over 170,000 views. Woah!
35. Hold your camera properly
You might not know it, but there is a right way and a wrong way to hold a DSLR camera. The correct way is to support the lens by cupping your hand underneath it. This is usually done with the left hand, with your right hand gripping the body of the camera. This helps to prevent camera shake. If you are gripping your camera with your hands on either side of the camera body, there is nothing supporting the lens, and you might end up with blurry photos. To get an even stabler stance, tuck your elbows into the side of your body.
36. Limit your palette
When photos have too many colours spewing out from them, they’re often hard to look at. Unless it’s a photo of a rainbow or the Mardi Gras. Try to focus on having one or two colours predominately featuring in your photograph. It will be more pleasing to the eye and will help set the tone of the image.
37. Get your subject to relax
This applies mostly to portrait style photography. As a press photographer, I spend most of my time doing one on one portrait shoots. I think it’s really beneficial to take the time (if you have it) talking to your subject, asking questions, showing an interest in whatever it is they do. I find it really helpful in relaxing the person and often they’ll say something and that can lead to a better photo opportunity. — Marina Dot Perkins
38. Inspiration from all forms
Take in as much photography as you can – online, and in books and magazines. But not passively. Look at different styles. Work out what you like or don’t like about them. Look at the technical elements of pictures and think about how they were made, and what the photographer is trying to say. The more you take in, the more arsenal you’ll have when creating your own work. — Leah Robertson
39. Be patient and persevere
With time, patience, and perseverance, you will get better; with each and every photo you take.
40. Break the rules
Now that you know some of the rules, go ahead and break them! Experiment. Have fun. Learn from your mistakes. Make up your own tips and techniques for taking fantastic photographs. I’d love to hear them.
Go forth and shoot!
About the author: Lisa Clarke is a photojournalist based out of the Capricornia region of Australia.
About the author: Lisa Clarke is a photojournalist based out of the Capricornia region of Australia.
There are a lot of inaccurate ideas circulating about “Royalty Free Music” This article will attempt to explain exactly what Royalty Free Music is and dismiss some of the most common misinterpretations.
In a nutshell Royalty Free Music refers to a type of music licensing that allows the purchaser to pay for the music license only once and to use the music for as long as desired.
For example you purchase a Royalty Free Music license for a video on your website. You pay one single price whether you have 100 visitors or 10,000 visitors, and whether you use the music for 1 month or 10 years. Or you purchase a TV advertising license for your new restaurant. You pay once and the commercial can play once a week or 50 times a week, for 3 months or for 5 years. You pay once and you use it for as long as you want.
The term “Royalty Free” is confusing for more reasons than one. In fact it simply means “Free of Royalty”. The term is in opposition to “rights managed” licensing where the purchaser pays fees (royalties) according to the number of times it will be used as well as the size of the territory. With Rights Managed licensing or “Needle Drop” licensing you would need to pay a fee every time the music is used or as the old term expressed every time the “needle is dropped” on the record.
Just as importantly here is what Royalty Free Music does NOT mean…
Royalty Free Music is NOT free!
It is “Free of Royalty” not cost free. Just like a fat free cookie is “free of fat” not free of cost. Or a “tax free” product is not free, it is just free of taxes. And yes some people may be offering their music for free – whether it is also Royalty Free or not! For example a composer may be offering you his music for free for your College film in exchange for listing his work in the credits.
Royalty Free Music is NOT Stock Music
Although most Royalty Free Music comes from Stock Music Library such as Premiumbeat.com they are not synonymous. A Stock Music Library is a music library that offers music already in stock – already made and ready to license and use. Although some people consider Stock Music negatively as cheap “canned music” it is not the case at all. You have the full range of music quality in stock music from very amateurish poorly mixed music to highly professional music tracks. Stock music is understood in opposition to “custom made” music that is created for a specific product – a film, a commercial, a TV show… Many stock music libraries offer their music on a Royalty Free basis, but other libraries prefer to offer their music with a Rights Managed model or “per usage” based on the frequency of use as well as the size of the territory.
Royalty Free Music is NOT Copyright Free music
I am not sure there is such a thing as “Copyright free” music since anyone who creates a piece of music automatically owns the Copyright for that music. The creator may not care and say that anyone can use his music for any purpose. In this case the Copyright owner is giving you the “right to copy” his music for any purpose. So it may be free to use but that does not make it free of Copyright. And this does not mean that the composer has given up his Performing Rights if his music ends up a background music on television for example. The composer as the Copyright owner may want to receive his composers royalties for the public performance of his music. Even the recordings of Public Domain music are not Copyright Free. The composition may be Copyright Free but not the actual sound recording (also called the Master). You can read an excellent text about Copyright and Public Domain music at PDInfo.com.
Royalty Free Music is NOT a specific type of music
It can be music in any genre from Classical to Heavy Metal to Country music. Instead it is a type of “Music Licensing” for commercial use. Commercial use here means using the music for more than your private usage (your home, your car, your iPod). Private usage is the right you get when you purchase a music CD or pay and download your music from iTunes for example. That does not provide you with any broader rights (your website, your videos, your slideshows, TV shows, etc.).
Royalty Free Music is NOT poor quality music
Any music can be licensed as Royalty Free music. The good the bad and the ugly. This choice for music licensing has strictly nothing to do with the quality of the music itself. The quality will vary enormously from one library to the other. The quality of library music has more to do with management policies, whether the music is hand-picked or not, whether composers are screened or not, etc.
Royalty Free Music is NOT cheap music
Royalty free music can licensed at any price. It is not a price structure, it is simply a licensing model. You can find Royalty Free music for $30 and you can find it for $600. It has nothing to do with pricing, it has to do with the licensing model of not charging royalties each time the music is used. This being said most of the time music licensed with a Royalty Free model is inexpensive and affordable for most people.
Royalty Free Music is NOT Royalty Free!! Say what?
Usually Royalty Free Music licensing does not include “public performance” royalties. Those are royalties paid to composers when their music is performed publicly – on television for example. But these royalties are not being paid by you (the music purchaser) they are being paid by the network that is broadcasting the show where the music is performed either as a featured piece or more commonly on television as background music. Performing Rights Organizations (PRO) like ASCAP, BMI, SESAC, SOCAN, PRS, etc. are being paid by the networks and are in charge of distributing the performing royalties to the music composers. So for the person purchasing the music license it is entirely Royalty Free but if fact some royalties may be paid to the composers by the PROs. Wikipedia mentions this as well on its Royalty Free Music page.
Why is it so confusing? Is there not a better term to describe Royalty Free Music?
The truth is that although I have yet to meet a single person in the industry who actually likes the term “Royalty Free Music”, it is the term that appears to be “sticking” at this time. Chances are in fact that you are reading this because you Googled these words.
Other expressions have been proposed by several people in the industry to describe Licensing from Music Libraries like Premiumbeat.com. These terms are better in many ways. But none of them are sticking for now. Here are few expressions that have been proposed to replace the confusing “Royalty Free Music”:
Pre-Licensed Stock Music
Pre-Licensed Production Music
Pre-Licensed Music Library
One-Stop Stock Music library
One-Stop Music Shop
Single Fee Stock Music
Single Fee Music Licensing
Single Fee Production Music
Pre-Paid Production Music
So should we call it One-Stop Pre-Paid Production Music Shop Licensing Library?
I guess for now we’ll stay with Royalty Free Music.